
Sunday, November 25, 2012
Finding Fatwood Pt. 3
In this post, and in the above video, I have concluded and shared what I have learned in my search for fatwood, so that others who are in a similar situation can be more successful in collecting this great natural fire starter.
Please feel free to utilize this video for your own quest. Happy hunting!
Tuesday, November 20, 2012
How To Cook Bannock In The Backcountry
In this video I show you one of my new favorite eats in the outdoors... Bannock!
Bannock is essentially just bread, but is very easy to make in the woods. It has been made for over a 1000 years, all over the world from the Scotts to the Romans to Native Americans, each with their own variety. Bannock is a simple recipe (included below) but was usually made and combined with whatever was available. Strawberries in season? Throw them in, etc.
One thing I will say in my own quest for getting bannock right, is that there really is no "right". Experiment with recipes at home until you perfect it and then try it in the woods.
NOMOREOP4'S RECIPE:
Thin layer oil on cooking pan
1/2 Cup Flour
1/2 TBSP Overflowing Sugar (more for increased sweetness)
1/2 TBSP Baking Powder (NOT BAKING SODA)
Pinch of Salt
1/4 to 1/2 Cup Water
Premix dry ingredients in a bag, add water when ready to cook. I have been most successful using only enough water to moisten all ingredients. I have not been successful when the bannock mix was a runny consistency. Do not flatten bannock or it will not cook through well and will burn on the outside. Bannock can burn easily if not careful. I add a bit of water and cover the pan to cook the top and sides faster.
Monday, November 19, 2012
Bivouac Backcountry Camping and Survival Skill Priorities - Finding Collecting and Purifying Water
*Disclaimer-Do not try to dispersed camp without the skills necessary to do so. Do this at your own risk
**I apologize ahead of time for some parts of this video. My camera was dropped and was working intermitantly during this trip.
In this video I walk you through a 3 day trip in the Allegheny National Forest. The area we were in was an isolated wilderness area that allows dispersed camping. I have previously made videos showing the important "priorities" as I call them when in a wilderness or backcountry camping situation but these can also be applied should you find yourself in a survival situation. Those 4 priorities consist of Water, Food, Shelter and Fire. This video shows some basic camp set up goes into detail on how we typically collect water as well as how we process it into clean drinkable water. I will annotate links to the other videos I have made previously as well as the other videos made while on this trip.
There are many ways to collect water, and the most effective way for you may very well be different for someone else. A lot of that depends on geographic location as well as what equipment you have with you. The techniques that I show are just my preferences so take them with a grain of salt.
Day 1
We hiked in a little under 3 miles to where we decided to set up our camp. We chose our campsite based on prevailing wind direction, sunrise and sunset location (to maximize sunlight), firewood availability, and proximity to probable water source locations. Our first day was consumed mostly with clearing debris, setting up our tents, clearing an area for fire and gathering wood to last for the night. We had enough wood to last us through the night and get us started the next morning about an hour and a half before sun set so at that point we got the fire started and had a good bed of coals by the time the sun had set.
Day 2
We woke up and ate a quick breakfast and then got to work. Our first task was to get the firewood stocked back up. Our location was great because we were positioned right between an area of hardwood and pine, so we were able to gather small dry dead pine sticks to get the fire started, and then transition to the heavier hardwood once we had a good bed of coals. Once the wood was stocked back up we stoked the fire a bit as we worked on some other camp tasks (links to those videos will be annotated). Once completed, we left camp to collect water which is where a majority of this video's talking points revolve around.
Our method for collecting water is very simple. We bring two empty gallon containers (we do not carry our entire water supply in for extended trips as that would be very heavy and inefficient). One of these containers is used to gather water from whatever source we can locate. That container is used to transport the water back to our campsite, where it is then boiled so that we may drink it. Once boiled, we transport the water in the other container, which only ever has boiled water within it to avoid contaminating the container.
Aside from collecting water from streams, ponds, lakes and rivers, there are other methods that can be used as well with just a few items.
Transpiration:
This process is the evaporation of water from plants. We merely step in and collect it. Throughout the day, water will evaporate from the plants and you can easily collect water by taking a small plastic bag and wrapping it around a leafy branch. MAKE SURE THE PLANT ISN'T POISONOUS! Leave the bag on the branch all day and come back right before dark. The more leafy the branch the better, the more direct sunlight during the day the better. This will yield a small amount of drinking water every day, multiple bags would be needed to even come close to sustaining a person.
Condensation (via Solar Still):
This method would most likely only be necessary in a very arid region where water is very scarce. Again with simple components a person can collect water using natural processes that occur in the world. First you need to dig a pit and place a pot of some other item to collect the water. Then lay a platic tarp or bag over the pit. Cover the entire edge of the tarp on every side. Use dirt, rocks, whatever you can find, to hold the edge of the tarp in place. Then take a rock, it doesn't have to be big, but heavy enough so that the tarp will dip slightly when you place it on the tarp right above the pot. As the moisture in the ground evaporates it will be trapped under the tarp where it will condense. As it condenses it will roll down to the lowest points of the tarp (right below where you put the rock) and drop into the pot ready to drink.
Stay safe...
NMO4
Monday, October 29, 2012
Wednesday, October 17, 2012
Finding Fatwood Pt. 2
The search continues...
Hello everyone. In follow up to Finding Fatwood Part 1, here is my second effort after I regrouped and did some extra research.
So during my first attempt, I focused on finding a Pine stump hoping that I might get lucky and find some concentrated fatwood. I was plagued by two issues:
1) Almost every stump whether young or old was completely rotted out.
2) When I did find the rare stump that had a solid inner core, it appeared as a false positive in the woods because the dampness of the ground made the wood take on a darker hue. By the time the wood sat to dry at home for a bit, it was obvious that I had not found fatwood.
Both of these issues are really the result of one cause; the ground (at least where I am searching) is too damp. The wood dies from rotting before any significant amount of turpene can be produced by the roots to settle in the stump.
Now it is possible that my location has a lot to do with it. Living farther north than the southern states that are infamous for having fatwood stumps every other step (like Florida), we have a different climate. My theory is that the ground is too damp here between all the rain and snow we get throughout the year that the tree doesn't have a chance (at least from natural death) to concentrate to the point to be considered fatwood. As there are no logging plots in my immediate area I have yet to test logged Pine stumps. All the stumps I have checked were either knocked over by other falling trees/wind, struck by lightning, or just actually died from a natural cause.
So after the first trip's failure and reflecting on the above conclusions, I regrouped and did some more research. I learned that the closest few inches of a dead pine branch can sometimes hold fatwood. From what I gather the tree "seals off" the dead branch from the living part of the tree. Same principle anytime a pine is injured externally, it will produce resin to seal the inner parts (this can also be collected and used for multiple purposes). So this time, my goal is going to be to cut off some dead branches and see what I can find...
One other theory that seems to make sense, is that the larger and older the tree is the more resin the tree should be able to pump. Saw this interesting Table Mountain Pine (Pinus pungens) on the way in and actually made a great find.
Table Mountain Pine

Dead Immature Cone

Mid Trunk that must of have severe damage done to it. It was covered in pure hardened resin.

It also had a dead branch protruding from it... Bingo!

Not only did I successfully find a good piece of fatwood before I even got to the area I was going, but I also harvested some pure hardened chunks of resin!

Just when I thought I had harvested everything this great tree had to offer...

Got a bag of hardened resin, and this one of pliable stuff.

Continuing on, I finally reached the woodline of the area I know pines are dispersed. I walked a little deeper in this time since I knew stumps were not a priority this time.
Look how quickly the woods change from deciduous to coniferous in the next three pictures. Use the tree in the far right of the first picture as an anchor point for comparison in all three:


And then I was in it. Large area of all pines, with plenty of dead branches to harvest. The reason for this area of pine is because this land had mining about 40-60 years ago or so, and the geography looks like they basically cut the top off of this hill to mine, and when they were done, they planted these pines. Their height seems to coincide with that timeline.

Every tree had multiple usable branches. It got to a point where I was no longer looking for fatwood, I was looking for pines with the best dead branches haha.


Here is the end product of the haul:
The hardened resin. Will make some pitch sticks or maybe pitch glue out of this.

The unprocessed lot of it.

The most concentrated piece. Check out that color!

Each of the pieces has a good 2-4 inches of concentrated fatwood. I kept another 2-3 inches of wood on each stick. Not the same as a stump, but this is was a great haul for me and a real learning experience. Hopefully this will help others who live farther north and have been having trouble finding good stumps.

Monday, October 8, 2012
Finding Fatwood Pt. 1
"Fatwood" is nickname for wood that has a high resin content and as such is very flammable and has a lot of uses for bushcraft and camping. It as actually terpene, which is what turpentine is derived from. While I have known about fatwood for sometime (by the way its also known as "fat lighter", "light wood", "pitch wood", and probably other names as well depending on where you live), I have never actually been successful at collecting my own.
Essentially it forms when a pine tree is either cut down or breaks. The roots continue to pump resin into what ever remains of the tree and stump, which causes concentrated pieces.
Occasionally on trips out to the woods I would make a half-assed attempt to check a stump or two, but was never thorough enough, and as a result, never successful. In the past, I always rushed and figured "I should be able to pull a stump out of the ground and light it right away" as I had seen some others do. But after some thought, I realized, a lot of these folks I have seen do this have lived much farther south, like in Florida for example, where the soil is usually much dryer than here in PA and most of the NE US. So my first realization was that based on how damp the soil can be, I will have to let the stumps dry out a bit before they will take a flame.
Another realization, is that because the pine tree areas around me are not logged, my best bet is going to be to find stumps that only recently separated from the rest of the tree. Again due to the how damp most of the ground is, a lot of the stumps I find rot out very quickly, because the tree usually died from natural causes (not being cut down)so most of the stumps also died around the same time. Finding pines that were cut down would be optimal because the stump would be alive and well, but I've got to work with what I've got. So what I learned today is to check the stumps that look like they are recent. The stumps that have the rest of the tree already fallen for some time and rotted out were all rotted out as well so this seemed to confirm my idea somewhat.
Here are some pieces I collected today, and what I learned from them:
The first one looked semi promising from the outside, but upon further inspection proved to be extremely rotted, helped along by its inhabitants.


The next stump I cam across was smaller and also was rotted on the outside, but with some help from my wetterlings, revealed a rock solid core. It looks like I found a winner here.


Some more cleaning revealed a nice red hue, and this looked and smelled like I finally found a good piece.


Tried a few more stumps with mixed results, some with success, most with completely rotted stumps.


One stump seemed *at the time* to reveal the best piece yet. More to come about this piece.

After about an hour of pulling stumps, I found a decent collection of promising pieces, some more so than others, but I was happy with my results for such a minimal time input. Some of the pieces appeared as though they were more concentrated than others.

On the way out I kept my eye open for pines with injuries to try to collect some hardened resin on the outside and found a jack pot.
This tree was recently injured and the sap was not hardened yet and was very easy to collect. Filled up a whole sandwich bag of very clean sap.


Got home and set the pieces out to dry a bit. One thing I realized is that the dampness of the ground can make the stumps look more "red" than they really are.
EDIT: After allowing the pieces to dry for a day, unfortunately I realized these were not concentrated enough to be considered fatwood. While they did have the smell, and some very small veins, they were not the real deal.


See part 2 for more success...
Saturday, September 22, 2012
Autumnal Equinox in the Allegheny National Forest
Work has consumed my life the past 12 months and it was time to get the hell outta dodge.
I've been planning a 3 day trip to the Allegheny National Forest for some time now, and since the weather cooled off and its the first day of fall, I figured today was a good day to scout for some campsites. Here just a few pictures I took.
Someone wanted to tag along. Not this time unfortunately.

Pack was a little heavier than I would have liked.

Kinzua Dam on the Allegheny Resevoir


Arose at 0600, showered and ate in an attempt to get my body aligned with what my mind was telling it. Hit the road at 0712 and made it to the trailhead at 1016. Would have been 3 hours exactly if I wouldn't have stopped at a gas station for a 4 minute bathroom break.

Sorry my camera was having trouble focusing. Only 3 hours away but these woods were very different from what I'm use to. No endless briar patches with 5 feet of visibility. No complaining here.

Here's a better shot.

1st of about 20 HUGE rocks.

This one reminded me of the movie "The Quest for Fire."

Another one.

Cool tree.


Only thing more frequent than the huge rocks, were the little toads and frogs.

Finally made it out!


How convenient, some one left a camp for me!

Nice view from someones else's camp.

My three work horses.

Now you guys can stop busting on me for only using a big knife and not having an axe/hatchet. I bought a wetterlings!

Relaxing enjoying the fall air.

Sneak Peek on my next review...

Thanks for looking and happy fall!
I've been planning a 3 day trip to the Allegheny National Forest for some time now, and since the weather cooled off and its the first day of fall, I figured today was a good day to scout for some campsites. Here just a few pictures I took.
Someone wanted to tag along. Not this time unfortunately.

Pack was a little heavier than I would have liked.

Kinzua Dam on the Allegheny Resevoir


Arose at 0600, showered and ate in an attempt to get my body aligned with what my mind was telling it. Hit the road at 0712 and made it to the trailhead at 1016. Would have been 3 hours exactly if I wouldn't have stopped at a gas station for a 4 minute bathroom break.

Sorry my camera was having trouble focusing. Only 3 hours away but these woods were very different from what I'm use to. No endless briar patches with 5 feet of visibility. No complaining here.

Here's a better shot.

1st of about 20 HUGE rocks.

This one reminded me of the movie "The Quest for Fire."

Another one.

Cool tree.


Only thing more frequent than the huge rocks, were the little toads and frogs.

Finally made it out!


How convenient, some one left a camp for me!

Nice view from someones else's camp.

My three work horses.
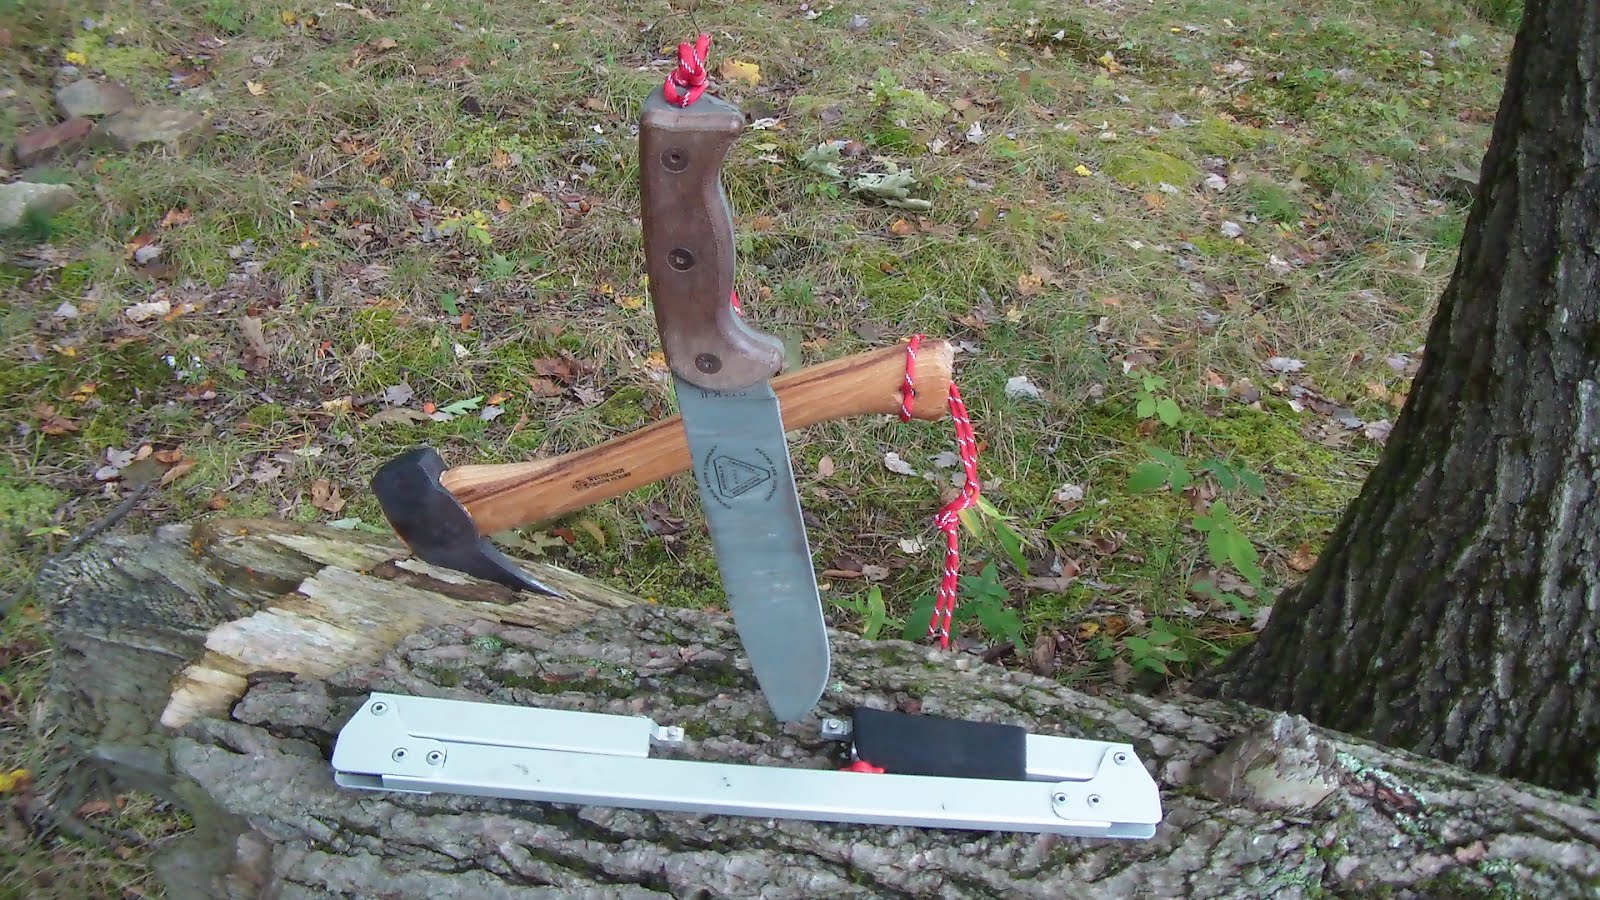
Now you guys can stop busting on me for only using a big knife and not having an axe/hatchet. I bought a wetterlings!

Relaxing enjoying the fall air.

Sneak Peek on my next review...

Thanks for looking and happy fall!
Subscribe to:
Comments (Atom)